We took the kids to the local zoo last weekend, we had such a wonderful time. But the heat mixed with tiredness from the races the day before just didn't make for the kids wanting to cooperate in front of my camera, lol. I knew I could count on my oldest though, she loves the camera, center of attention is her favorite place to be, lol! Here's a few shot's I took. I think one of my favs is the tigers in the water, I wish the cage wasn't in the photo though.....but then again I guess I'm glad it was there, lol!
Sunday, July 31, 2011
Saturday, July 30, 2011
It's Reveal Day At SKETCHABILITIES!!!
Today is reveal day over at Sketchabilities!!!
This sketch was so much fun to play with, it really allowed for so many creative options, I really enjoyed working with it!

Here is my take on this sketch
The background paper is from an older My MInds Eye collection, I used scrap paper, a rectangle doily and ribbon for my layering. The photo's are of my oldest daughter posing by the planter in front of our house. I added a bow, flowers and flourishes to finish it off!
I can't wait to see your take on this sketch, be sure to upload it on Mr Linky at
Happy Scrapping!!!
XOXOX
Friday, July 29, 2011
Friday Finds
My find's from Pinterest this week are all soft, vintage, feminine and delicate! All my favorite things! I am so inspired myself by these gorgeous photo's, they speak to me I hope they have you too!!


Thursday, July 28, 2011
This layout is of my DH's childhood dog which still happens to be alive, unfortunately not for much longer. I had taken this photo of her in June and wanted to make a nice page for my DH and kids to remember her by, I allowed them to help me design the page....as kinda therapy for them. The news of the dog needing to be put down is a very rough subject for them.
The paper is made by The Paper Loft and the flowers I made with punches and just layered them together and added some bling in the centers. The vines are also made from a punch. The journal spot is from the Bo bunny Timepiece collection. I used white thickers and painted them with Tim Holtz crackle paint for the title.
Simple and easy!
Thanks for looking!
Happy Scrapping!!!
XOXOXOX
Tuesday, July 26, 2011
Supercross Pictures
We had a blast at last Saturday's supercross! The kids and DH all did well, we brought home 3 trophy's and 1 medal! Here's a few photo's to share:
7.25 CReative Soup's Mojo Monday
Sorry I'm late posting this but I had such a busy last few days......
I love Creative Soup's Mojo Monday this week, the challenge definately requires you to use your creative crafty side, while also allowing for a variety of creative options. I created this box below as my take on this challenge!
I used an old corrigated candy box and altered it with silk roses, lace, ribbon, trim and twine and topped that off with a gorgeous Jolee golden cherub which I used irredescent stickles to add sparkle to it's wings. I also used glitter over the roses to make it pop!
Don't forget to check out the other CT's example's as well!
Happy Scrapping!!
XOXOX
Friday, July 22, 2011
Wednesday, July 20, 2011
More Great News!!!!

I am so honored to share with you all that I have been selected to be a part of the new Sassy Lil' Sketches Design Team August 2011 through Febrauary 2012!!!! I am so excited to be working with the lovely Cherie and Katie along side a group of some amazing ladies! Without further adieu allow me to introduce your new Sassy Girls!
Week 1 Sassy Lil' Sketches DT
Melenia Agapides
Jenifer Evans
Jennifer D. Jesse
Holly King
Dinah Maningat
Marjorie Anne Van Patten
Week 2 Sassy Lil' Sketches DT
Jenny Ahlund
Pia Astrand
Regina Castillo
Kirsten Michelsen
Melissa Priest
Missy Whidden
Week 3 Sassy Lil' Sketches DT
Jennie McGarvey
Krissy Clark McKee
Wendi Robinson
Lisa Rounds
Sarah Utting
Lisa Watson
Week 4 Sassy Lil' Sketches DT
Amanda Hartmann
Tone K. Jensen
Michelle McClure
Katie Nolan-Denham
Kelly Rutherford
Kylie Symons
"Switch It Up" Sassy Lil' Sketch DT
Jessica Carter
Mia Castrillo
Eleni Gratsia
Ashley Horton
Nancy Kelsin
Martine Labelle
Irini Liolia
Bec Miller
Sandi Taloumis
Sassy Lil' Card Sketch DT
Brenda Becknell
Vanessa Buzard
Lyn Darda
Jamie Fox
Alecia Harper
Tracey Kelly
Debbie Lacy
Michelle (Shelly) M. Maxwell
Marie Papadopolou
Brenda Rose
Catherine Schroeder
April Walker
Karen Zabuska
Tuesday, July 19, 2011
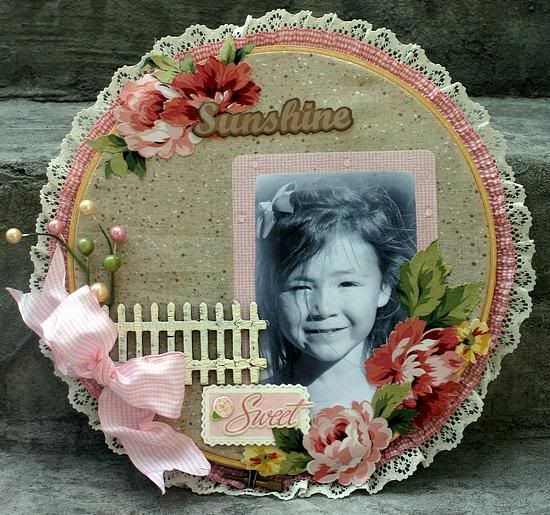
A NEAT WAY TO SCRAP WITH FABRIC
I was contacted a few weeks ago by Scrapbook News and Reviews and asked if I would like to do a Featured Artist spot for them! After I got over the initial shock and excitment I got right to work on my project! I hope you enjoy!!!
Supplies: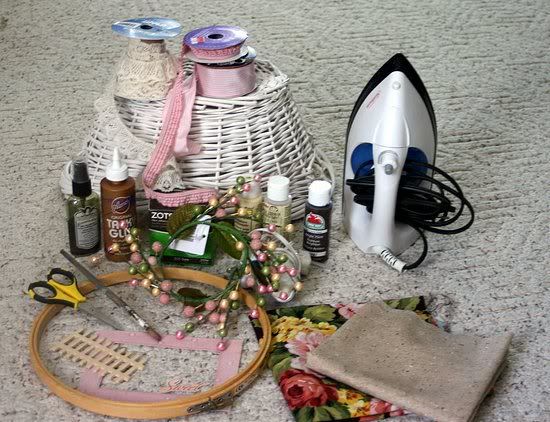
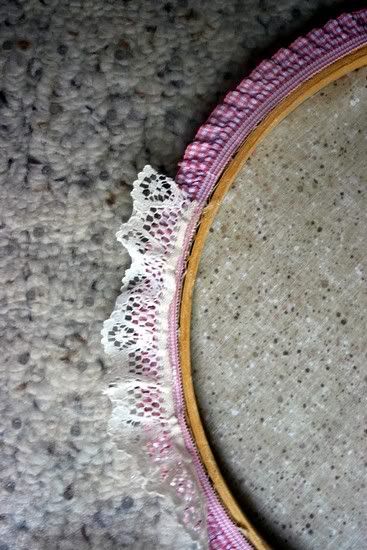

- Embroidery hoop – Your base fabric size depends on the size of the embroidery hoop you’ll be using (non-printed works best)
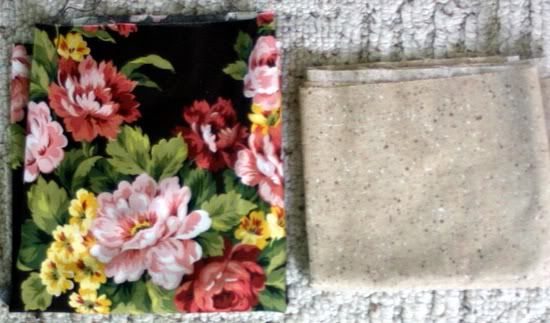
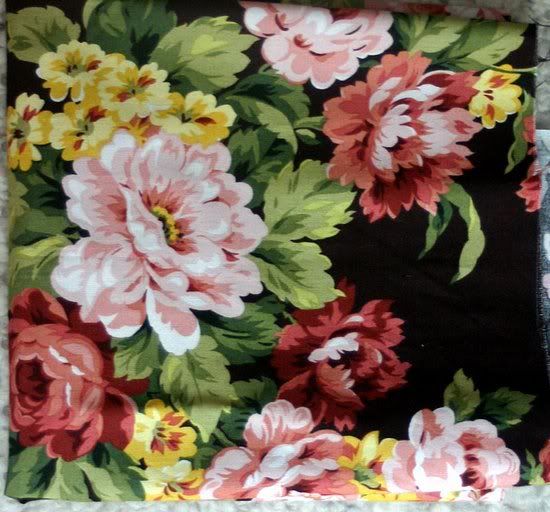
- Printed fabric - make sure the print is something you can actually cut
- Lace - the amount depends on the hoop size and how many layers you want to use
- Iron
- Scissors
- White PVA glue
- Hot glue gun and glue sticks
- Cardstock or frame to back your photo
- Titles, embellishments – keep in mind that they shouldn’t be very heavy
- Ribbon
- Photo

If you like my fence, you can purchase a raw 3-pack at most craft stores for under $1.50. To get the crackled look, you’ll need a dark color of acrylic paint, crackle medium gel, and a lighter color such as cream or white. Paint your fence first with the dark colored paint and let it dry thoroughly. Then coat with crackle gel, which will also need to dry completely. Once the last coat is dry, it’s time to finish it off with a coat of the lighter colored paint. Presto, you now have a cute little vintage looking fence.
Picking Your Fabric
There are so many fabric theme options out there and no matter whether you want to do a floral girly layouts or a dinosaur theme, the options are endless. Once you’ve determined your theme, start by picking your patterned paper first. It’s easier to coordinate the basic fabric your pattern rather than vice versa. In my opinion, a simple softly patterned fabric base works best, but hey, if you want to use a patterned base, then go for it. Being creative is the whole object, right?

Step One: Your fabric is more than likely going to have creases where it was folded and will need a quick run over with an iron. I know, I know, it’s a horrible chore but I swear it only takes a second or I wouldn’t do it. You’re talking about a lady here who buys clothes pending on how they’ll look after they come out of the dryer and if they require ironing, forget it!
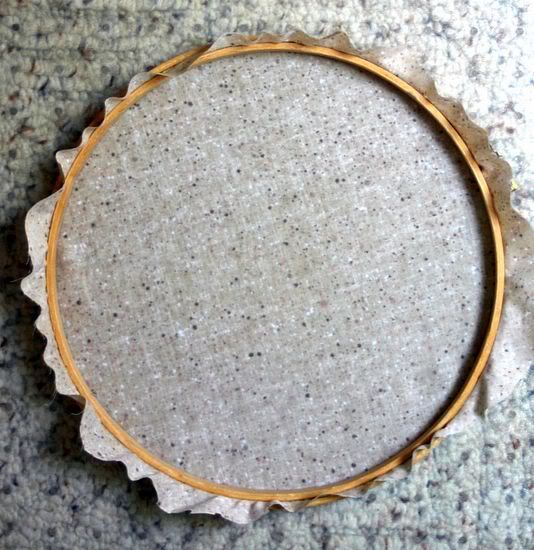
Step Two: Now that the boring stuff is out of the way, it’s time to get creative. First, you’ll need to affix your base fabric in your embroidery hoop tightly. You can get the slack out by gently tugging the overhanging fabric at the bottom. If necessary, tighten the screw on the hoop. Tip: To get the most out of your fabric, place your embroidery hoop as close to the edge as you can.
Step Three: Trim the excess fabric from around the bottom of your hoop.

Step Four: Glue your lace to the back side of your embroidery hoop (a hot glue gun works wonderfully). Tip: If you plan on having more than one layer of lace, start with your smallest piece and glue it to the outer edge while leaving room for your next layer(s) and so on. For a more masculine layout, the lace can be skipped or you can distress it first. There are a lot of options out there.

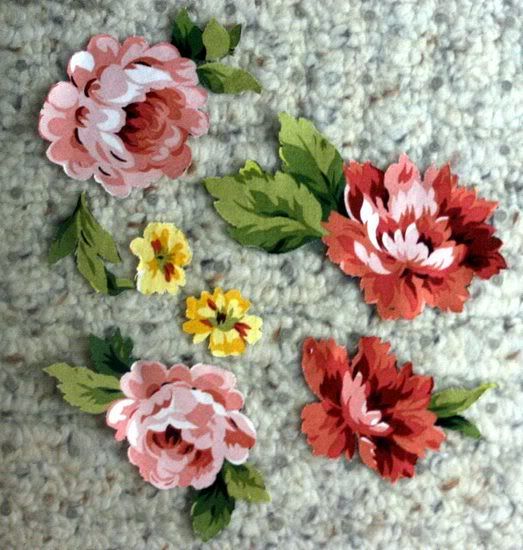
Step Five: Cut out the images you want to use on your layout from your patterned paper. This technique is actually where the term fussy cutting originated. To fussy cut, is to target and cut a specific motif that’s printed on fabric, rather than randomly cutting yardage. I bet you didn’t know I was going to give you a dictionary lesson as well! Tip: Use sharp scissors to prevent fraying.


Step Six: Time to get your page all laid out. Keep in mind while you’re arranging your page that you cannot put a lot of pressure on the fabric as you’ll make it loose from the hoop with no way to tighten it again without the excess hangover to pull taut. To adhere your fabric, just treat it as you would any embellishment, but be sure to get glue close to the edges to prevent lifting and fraying. To get the glue on my fabric, I gently dabbed small dots all the way around the fabric, careful not to cause fraying. White PVA glue works great on fabric and paper pieces and I used hot glue for the fence and bow.

There you go – a gorgeous and unique scrapbook page that is sure to wow your friends and family! Bonus: This page makes an amazing gift or wall décor for your home.
Monday, July 18, 2011
Creative Soup 7.18 Get Inspired By Color Mojo Monday Reveal
It's reveal day at Creative Soup, this week's Mojo Monday was so relaxing, I love when challenge's are so easy they feel second nature! This week we were to create a layout using at least 4 different colors, a challenge that I definately loved! I think as scrappers and paper crafter's, color is inspiration for most of us.....it's amazing how much a layout can change by just adding or taking away 1 color from the page.....It's just amazing how much influence color has on our creations!
Saturday, July 16, 2011
Friday, July 15, 2011
Sketchabilities Reveal Day
Today is reveal day over at Sketchabilities, so if you haven't checked out the AMAZING page's the designer's have created from their take on sketch #51 shown below.....I highly reccomend you do so, there is some fabulous scrappy goodness sure to inspire anyone over there today!

Let me start off by just saying I'm soooo super excited for my very first reveal with Sketchabilites today, I am so honored to be a part of their amazing team, there is some uber talented ladies on the team, and I'm still in awe that I'm part of that! Ok well, now that that's out of the way, lol below is my take on sketch #51
I really enjoyed working with this sketch, it's so versatile as to what you can do with it....as you will see from the designer takes. The photos are of my oldest daughter, whom loves the camera by the way, and I'm begining to think the camera loves her...the lil turkey photo's so well! The background paper is from an older My mInds Eye collection which unfortunately I no longer remember the name. The beautiful banner is also MME, the bling is from Mrs Stephanie Walker's Etsy shop....guy's she does a great job...I'm going back for seconds check her out http://www.etsy.com/shop/scrapashopaholic!! Details and close up's below on the flowers.
I used this image I found on Pinterest.com as color inspiration for the sketch, I love the soft palette and vintage feminine feel it has!!!
Last but not least....the flowers!!! Believe it or not they are not paper but fabric! I fussy cut them from a floral printed fabric and they work just divine! It's my new obsession!! You just have to cut gently as not to rip or fray the fabric and there may be a better adhesive choice but I have found the thicker zig pen works just fine and holds it down well!
I hope I've inspired you to create your own page using sketch #51 and that you love it as much as I have, don't forget to use Mr Linky to link your project!!
Subscribe to:
Posts (Atom)


