Friday, July 27, 2012

Welcome to the ScrapThat! August Kit Reveal and Blog Hop!!
We are delighted to introduce our kit this month featuring the beautiful Charlottes Dream Collection from Kaisercraft.
This kit has tons gorgeous products such as... lace, pearls, die cuts, rub-ons, tulle, as well as an array of pretty flowers and much much more!
 August Kit Reveal
"Once Upon A Dream"

Main Kit $39.99
NOTE: The Main Kit cost for non-members is $44.99


Embellishment Add-On $14.99
NOTE: The Embellishment Add-On cost for non-members is $17.99


Flower Add-On $12.99
NOTE: The Flower Add-On cost for non-members is $17.99


Paper Add-On $9.99
 NOTE: The Paper Add-On cost for non-members is $12.99


1- Kaisercraft- Charlotte’s Dream- Illusion
1- Kaisercraft- Charlotte’s Dream- Deja-vu
1- Kaisercraft- Charlotte’s Dream- Daze
1- Kaisercraft- Charlotte’s Dream- Vision
1- Kaisercraft- Charlotte’s Dream- Fantasy
1- Kaisercraft- Charlotte’s Dream- Prayer
1- Kaisercraft- Charlotte’s Dream- Contemplate (12” die cut)
1- Kaisercraft- English Rose- Charlotte
1- Bazzill Card Stock, Aqua
1- Bazzill Card Stock, Olive
1- Bazzill Card Stock, Tan


We are currently accepting new Kit Club Members.
For more information, complete the form on the link below:

We also have our August  Sketch Challenge Posted

Everyone is welcome to participate, all entries due by July 15th
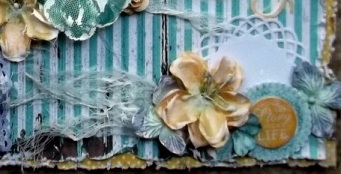
Here's my take on the sketch
Created using the Main Kit, and Flower Add On as well as some of my own personal stash

Our Blog Hop features 9 fantastic blogs from our Design Team

 To qualify for this month's Prize you must complete the following:
* Visit each blog listed on the hop to see what each Designer has created using this month's kit and sketch (comments are very much appreciated)
* Each Designer's blog hop post will feature a word, to make up a secret sentence, collect these words along the way and follow the directions provided in ScrapThat!'s forum when you are all finished.
* You must become a FOLLOWER of each blog along the way and LIKE us on our Facebook Page!
* Post the ScrapThat! Blinkie on your blog
* The last stop on our Blog Hop is our Forum, follow the link provided and complete the remainder of the Blog Hop Instructions

The Blog Hop ends July 30st 12AM CST
Prize MUST be claimed within 3 days of the announcement which will be made on the ScrapThat! Blog August 2nd  
If left unclaimed a NEW winner will be chosen ~
Please Note: for anything larger than an envelope, winner will be responsible for the cost of shipping.

 MY SECRET WORD IS:
Collection

Next hop over to:

Should you lose your way, come back here for the Blog Hop sequence:
ScrapThat! Forum


Ct-reated using the Main Kit, Flower Add-On as well as some of my personal stash
Created using the Main Kit, Embellishment Add-On as well as some of my personal stash
Created using Main Kit as well as my personal stash


Wednesday, July 25, 2012

It's Sneaky Peek Time

ScrapThat! August Reveal is just around the corner.....
Friday to exact!!!

I can tell you by the looks of ours 
Sneak Collage
this reveal is going to be stellar!

I could keep going....but why tease?!?!


It's simply beautiful isn't it!
Please check back
for ScrapThat!'s full reveal Friday!

Tuesday, July 24, 2012

Coffee Altered Flower Tutorial

Hi There,
I hope you are all enjoying your warm summer days!

I have a simple tutorial on how to alter the Petaloo Flowers that came in
ScrapThat!'s July Kit
"Summer In My Garden"

It's super easy and quick!!

But first I wanted to share a few tips I came up with using the Kit:
* When removing your resin window pieces...do so with caution...I learned this the hard way a long time ago
* I wanted to use my window on 2 different projects more like shutters, so I used a dremel to cut it in half!
* I took the tan buttons off the white fowers and replaced them with the white rose buds in the kit
* I used Helen's tip from last month and snipped the Zva flowers in half to make them go further

SUPPLIES

**Flowers
**left over coffee in some sort of shallow dish
** blow dryer
**napkin


I wanted to show you a quick before of the flower I am going to alter. It's yellowish in the center and a bit flat, but I am going to change this so it matches my layout I want to use it on.


STEP 1:
Simply dip your flower into the old coffe, wetting it completely. Be sure to GENTLY sqeeze out the excess liquid. These flowers become more delicate when they are wet, so handle with care so you do not tear them during this process. You may choose to let it set on a napkin for a few minutes once you've sqeezed it out to let the napkin absorb some more of the dampness. Thesen suckers can take a while to dry since they are made of mulberry and tend to hold alot of liquid.

STEP 2:
Once your flower has set to dry for a few minutes you are ready to speed up the process while giving the flower it's new shape. Remember in the "before photo" above how the flower was a bit flat? Well now we want to give it more dimension, by simply scrunching and rolling it around between your fingers while drying it with a blow dryer. There dryer will get hot if you keep it in one place you you will need to move it around as you go and it will take a little bit to get it completely dried, but trust me the results are so worth the effort!

Once your flower is completely dry and you are happy with it's new shape, it's ready to use!!!
The tan flower below is a close up of my after once I altered it with the coffee!! You may notice that mine has a bit of white on it too, thats because I used a few dabs of white acrylic paint here and there ll over my layout!!!


My finish results!!!


I hope you loved my tutorial and found it useful!
Thanks for stopping by!

Saturday, July 21, 2012

Bird Is The Word Challenge

So after looking through a few blogs I follow I kept seeing layout's done for
Bird Is The Word Challenge Site
Before this I had actually never heard of the site before, but of course afer seeing multple projects created for BITW of course I had to check it out!

Now I do feel I played along during a week with a tougher challenge, lol.....my layout seems to make no sense with the word.....but I tried LOL
The challenge word was "Color"
Below is what I came up with!

YOU COLOR MY WORLD
Talk about layers, ths layout is chock full of layers!!

I should mention that my page is based also on the coordinating sketch offered with the word challenge!


Cute sketch right?!?!?!

So I did this layout so long ago now, I  am really fuzzy on the details of supplies and such, so I'm just sharing today for inspiration!

Things will start calming here soon as the kids summer break will be nearing an end soon, and once back in school I will have much free time on my hands!
 
So with that being said, I suppose I should head down to my scrap room that has seen my face once or twice in the last two weeks.....because I am out of goodies to share with you all! I'm affraid I will loose my mojo for good if I don't get some scrapping done soon!!!
 
So Happy Scrapping!!!!

Friday, July 20, 2012

Creative Scrappers / FWAB

I created this last month, like before I apologize for my tardiness in getting this blogged, you guys know how it is in the summer.
I usually never play along with Creative Scrappers....mainly just due to lack of time, but I am a big fan of Amarylis Doria's sketches so I was excited when I had time to play in this challenge!

And the icing on the cake......I got to use some of my yummy Flourish With A Bling Product's
I love all the opportunty for ayers in this sketch!


Our Baby

This is a layout of my sweet youngest child the day we bundled her all up for her trip home from the hospital. It doesn't seem like that long ago and she's already almost 6 years old. I miss those sweet baby tender moments. In my heart I know all of my children will forever be my babies, but sometimes it's so hard to have to let go and allow them to spread their wings and fly!

So enough of my babbling and on to the page details!!
The paper is from K&Co, sorry I cannot remember the collection.....
But as you can see I distressed the heck out of it with my Invild Bolme Distress Tool before applying layer upon layer of yummy goodness!
I tried to stick with the soft pink and moss green tone, but ended up with a few more vibrant papers as well, which ended up being ok, because they seemed to match my yummy Flourish With A Bling Grace Pearl Flourish in PLum Color brilliantly!

FWAB Grace Pearl Flourish Plum
FWAB Grace Pearl Flourish In Plum

 This is a close up of the upper left side, I wanted you to be able to get a closer view of my flower cluster and bling. You may notice it's mixed with a bit of cheesecloth for added dimension and texture. And everything was given a generous coating of white acrlic paint and gesso to give it that tone downed white washed shabby look! I also gave a few dribbles of paint down the photo!

Another close up to share, this one is from the lower right side...basically the same as the top except I sqeeezed in a Martha stewart journaling card as well as plent of my FWAB Bling!!! Oh yeah and a Prima Resin Window.......speaking of Prima, I should mention all the flowers and leaves are also Prima Goodness! I love my Prima products and love the idea of more is better!

Thanks for stopping by! I hope you enjoyed and are inspired to get messy as well as grab your own stash of
Flourish With A Bling Products


HAPPY SCRAPPING


Thursday, July 19, 2012

Mini Album

Those of you who follow my work, know I don't tent to make very many mini albums, actually come to think of it, I don't believe I've shared one I've made online before....   :/
So it's about time I did I guess.....

So created this just for, no special design team project or challenge .......I just made it simply because I felt like it, which I must admit felt good!

So Without further babbling from me, I will just go ahead and share my project with you!

So this is the cover of my album! I am just so pleased with out it turened out!


So what do you think?

I am trying to keep my babbling short since the post is so full of photo's....I will just share that the papers are a mixture of Websters Pages and Basic Grey! The flowers are a mixture of handmade and of course Prima's! Everything else was just a random modege podge of items in my stash that just happened to match!!

Hope you enjoyed!


Wednesday, July 18, 2012

TCR #117

Once again I am behind in my blogging, wow lazy summer days really seem to be taking a toll on me!  I am about 2 weeks late in posting this, but better late than never I guess....

I created a layout based on
The Color Room's Palette #117

Palette #117-{Her Room} Inzpira Magazine
When I first saw tis palette I wasn't sure if I was going to play along that week, because the palette was a little more bright than what I was used to......however I was motivated at how awesome my layout from the week before came out using a TCR Palette, also by th efact that I'd just recieved a box of goodies from Websters Pages which included some yummy Girland Collection (the pink diamond patterned paper) Once I had decided to move forward in creating with this color palette I was still left with the question of what photo I had in my stash that would work......while digging around and mulling over possibilities I came accross the one shown on my page below. It's a school photo of my oldest daughter......I had it tucked away because once again the color palette in the photo kinda scared me a bit...however it seemed to be the perfect option for this palette


Like I mentioned above, this is a photo of my oldest daughter, although not my fav picture of her, it still worked wonderfully with this color palette.
The papers are a mixture of My Minds Eye Miss Caroline, White Cardstock, as well as Websters Pages Girl Land Collection.
I distressed, misted, and piled on the gesso on all my layers as well as smearing some irredesant paint in random areas to give things a bit of highlighting.

I am running short on time, sorry guys I will not be psting close up's today...

But I hope you've enjoyed my page anyway!


Tuesday, July 17, 2012

TCR Palette #116 / FWAB

Omgosh I cannot believe I am just getting to blogging this, we have been so busy enjoying our Summer, I can't seem to keep up!

I guess in this case better late than never??
Before I share my layout with you, let me explain how I came about creating it.....
a couple of weeks ago I was up late scrapping and happened to be chatting online with one of very good scrappy friends.....I had played and played with this palette from
The Color Room

Palette #116 {Her Room} Feature Art

However my mojo had apparently left the building, I was feeling like my creations were all begining to look the same and I needed a fresh idea.
My online scrappy friend suggested we each give each other a sketch challenge.....unfortunatley I didn't save the one she'd found for me, but it was exactly what I needed to get the ball rolling.

Apparently so much so that my layout was featured for
The Color Room's Top 5
using this particular color palette!

Maybe I should try this more often!?!?!

Without further ado, this is what I came up with

 
This is a layout of  my sweet lil girl, also my youngest child.....she loves posing for the camera and I think the camera loves her as well!

I used a combination of paper collections to ceate this page, including
My Minds Eye Miss Carolina Collection
Fabscraps Rustic Collection
As well as a random scrap, for the layer behind my photo

I used my Invild Bolme Distress Tool to rough up the edges and give it that grungy look that I love so much, before I started layering my goodies on.

This a close up of the flower cluster, my bling and bow beneath my photo. Before I go any further though, check out the flourishes at each side of the flower cluster
These might just be my favorite part of the whole layout!

FWAB Jasmine Puffy Flourish Latte - Click Image to Close

I simply snipped them up a bit, so that I was able to spread them out throught my page!
I truely love the way they seemed to add that amazing finishing touch to my flower cluster!

To check out your own Flourish With A Bling Products
click HERE

The flowers are a mixture of
Zva
Prima
I Am Roses

They are placed over the top of a generous layer of cheesecloth for some added interest and texture.
I white washed them all using some white acrylis paint to tone them down a bit and give them a more shabby look.


I also wanted to share a close up of the flower cluster in the lower right corner, also filled with layers of cheesecloth and flowers! I also included a Martha Stewart scalloped journaling spot as well as a cute chipboard sticker from My Minds Eye Miss Caroline Collection!

I hope you loved my page as much as I do!
Thanks for stopping by!
Happy Scrapping!


Monday, July 16, 2012

Scrap Perfect DT

ScraPerfect

I have some great news, I have been asked to join
Scrap Perfect's Design Team!!

I had the opportunity a while back to sample some of the adhesive from my local scrapbook store and instantly loved it since I tend to use alot more liquid glue than adhesive tapes. I am thrilled to work with as well as help promote Scrap Perfect Products, please stop over and check em out!


Tuesday, July 10, 2012

Her Graduation Day/ June Prima BAP/ FWAB

Wow, I have had so much to share with you lately, I sure hope my mojo stays right where it is, because I sure seem to be on a roll....I really hate when it leaves the building LOL!


I created this page a few weeks ago, but am just getting around to having room on my blog to share it with you!


I took this photo of my youngest lil munchkin back in May at her Preschool Graduation, she was such a happy camper and so proud of herself that day, which she definately deserved to be!
I must say my husband and I were super proud as well, and thats why I am very excited to share a glimpse of this happy day with you all!

I used the Gorgeous June BAP Sketch from Prima
BAPHeidi
I have been lucky enough to play along with the last two Prima sketches!

So here is my take on the yummy sketch above:

Look at that face, she is such a sweet lil thing, I can't resist that look......it just completely melts my heart! Before I was a mother, I never realized just how much you can whole heartly love something or someone more than anything in the world! My children have proven to me otherwise....I love them more thanlife itself and I thank God everyday for the blessings in my life. I am a truely lucky woman!

Ok, sorry mushy rambling moment....lol happens sometimes.....

So back to this layout of mine....
The papers are left over from my ScrapThat! May Kit and are delish Prima Nature Garden Collection! I distressed the edges using my Ingvild Bolme Distress Tool.....lol MY FAVE TOOL!
Look how yummy it makes the edges look! I also have some DELICIOUS Prima flowers and Flourish With A Bling Products as well as some other yummy goodies!

Unfortunately I forgot to take side view close ups so that you can see just how layered this layout is before I sent it off to my local scrapbook store to be featured on their customer wall! But I do have a few other close up's to share.

This is a close up of the flower cluster on the left side of the photo, it's layered over a generous mixture of burlap and cheesecloth and I just love the way these two item work together. I added some BEAUTIFUL Flourish With A Bling Grace Pearl  in copper  to the sides of my flower cluster. If you haven't heard of
Flourish With A Bling Products
then it's high time you check them out, they are an amazing bling manufacturer out of Australia and I am super proud to be designing for them, I just love their products and I know you will to!
for more info click HERE

You may notice that my twine rope, flowers and bling above as well as the cheesecloth and burlap are all a bit white washed and shabby looking......well thats because I dry brushed white acrylic paint over anything that would stand still! I love the way it ties everything together and tones it down as well as create an over all cohesive look!

Here are a few more close up's ENJOY!


Thanks for stopping by, hope you enjoyed!
Happy Scrapping!


Monday, July 9, 2012

July Kit Tag

Good morning scrappers! Hope everyone is enjoying your summer, my kiddo's have been on vacation with family for a bit and I seriously lonely during the day without them.....(but I guess I cannot say that I've been bored?!?!?) I have taken the opportunity to enjoy plenty of time in my scrapbook room. I have just had this urge to scrap my brains out this summer and really try and experiment with new techniques. I'd like to think my efforts are paying off!

I don't know, you tell me! I have a VERY DIFFERENT PROJECT to share with you today!
Those of you who follow my work, may know that I do not make tags.....as a matter of fact this may be the second one I've ever attempted as the first one I tried at the begining of last year  was super ugly!!!! And that may even be an understatement!
However I am pretty happy with the turn out of this one and may try some more soon with further details, I saw some great ones on Prima's blog a while back and was beyong inspired!

So here it is, my second ever tag attempt
I just used left over supplies from my ScrapThat! July Kit
"Summer In My Garden"

For information on purchasing your own ScrapThat! Kit email


I have to make this post quick today, sorry....lots of stuff to get done today, but just wanted to drop by and share!

Hope you love it!

Sunday, July 8, 2012

How Does Your Garden Grow


Hi everyone! I'm back again today to share another one of my ScrapThat! Layouts, using my July Kit
"Summer In My Garden"


For information on purcashing your own ScrapThat! Kit, email
friends@scrapthat.ca


HOW DOES YOUR GARDEN GROW
This layout created was created with my ScrapThat! Crop Challenge in mind, I used the image below as my inspiration.

I love this photo, and was super excited at how well it worked for this kit!!

I found the photo while browsing online images! I fell in love with the beauty of that little girl, it's what inspired my title along with the "Garden Theme" of the kit!
When I saw this photo, the nursery ryme
"Mary, Mary quite contrary"
came to mind!

I used Fabscrap's Organic Collection papers from my July ScrapThat! Kit, they are just so yummy to work with and almost begging to be distressed!! Which I did, using my Invild Bolme Distress Tool, my favorite go to tool!!! Love that thing and highly reommend it to anyone who doesn't have one yet!!
I used left over Prima Alpha's from my ScrapThat! May Kit on this page, because I needed some smaller ones and these seemed to match with perfection! They allowed me to create this large title! What I love about those alphas are the texture....can you see the yummy canvas look to them? They are just wonderful and I will probably be purchasing some more very soon! 

You may also notice that I cut the center from my doilie....those of you who follow my work know that almost every layout I create includes a doilie, I think it's safe to say that I am addicted! I cut the center out to allow more of that beautiful Fabscraps paper to show through, it's just so yummy, I didn't wanna waste a bit!
I wanted to show you all a close up of my flower cluster layered over a heap of cheesecloth. I gave a light white washing over each of them using my dry paint brush and some white acrylic paint. I also added a drip here and there to my cheesecloth.....
Above the flower cluster is my handmade fence using the craft wood included in the July Kit.....I used my Invild Bolme Paved Road Ink to dye the sticks before using white crackle paint over them. Once they dried I came back with the ink pad and gently brushed the edges here and there as well as over the tops in various places! I topped them off with 2 thin strips of white cardstock that I also inked to make it look like a picket fence, which was what inspired me most on the image shown above....along with the garden theme and color palette.
This is a close up of the right side of the photo and flower cluster, which also sits on a bed of cheesecloth and bears a white wash of acrylic paint.
If you look closely at the button in the center of the bow, you will see that I also gently and randonly white washed the medal part with paint as well, which gives it avery shabby look!
The larger white flowers in the cluster originally had tan buttons in the centers, but I didn't like that much so I took the buttons off and replaced them with the smaller white flowers from I Am Roses!
Also another item from the kit that I altered is the window shown in this photo.....it was originally a whole window and my Dear Sweet Handy Husband used his dremel and cut it in half for me!
Thanks Honey!

Well that's all for today folk's I hope you've enjoyed a tour of my page and are inspired to create your own beautiful page!'

Happy Scrapping!